---
title: Scenario 1 Online Activation (Windows 10)
description: Scenario 1 Online Activation
ms.assetid: 94dba40e-383a-41e4-b74b-9e884facdfd3
ms.reviewer:
manager: laurawi
ms.author: greglin
ms.prod: w10
ms.mktglfcycl: deploy
ms.sitesec: library
ms.pagetype: activation
audience: itpro
author: greg-lindsay
ms.date: 04/25/2017
ms.topic: article
---
# Scenario 1: Online Activation
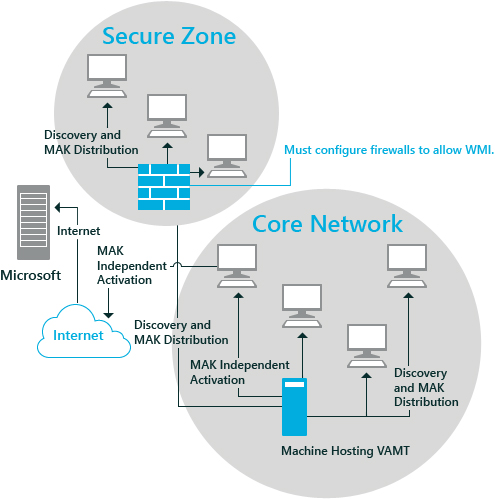
In this scenario, the Volume Activation Management Tool (VAMT) is deployed in the Core Network environment. VAMT is installed on a central computer that has network access to all of the client computers. Both the VAMT host and the client computers have Internet access. The following illustration shows a diagram of an online activation scenario for Multiple Activation Keys (MAKs). You can use this scenario for online activation of the following key types:
- Multiple Activation Key (MAK)
- Windows Key Management Service (KMS) keys:
- KMS Host key (CSVLK)
- Generic Volume License Key (GVLK), or KMS client key
- Retail
The Secure Zone represents higher-security Core Network computers that have additional firewall protection.
## In This Topic
- [Install and start VAMT on a networked host computer](#bkmk-partone)
- [Configure the Windows Management Instrumentation firewall exception on target computers](#bkmk-parttwo)
- [Connect to VAMT database](#bkmk-partthree)
- [Discover products](#bkmk-partfour)
- [Sort and filter the list of computers](#bkmk-partfive)
- [Collect status information from the computers in the list](#bkmk-partsix)
- [Add product keys and determine the remaining activation count](#bkmk-partseven)
- [Install the product keys](#bkmk-parteight)
- [Activate the client products](#bkmk-partnine)
## Step 1: Install and start VAMT on a networked host computer
1. Install VAMT on the host computer.
2. Click the VAMT icon in the **Start** menu to open VAMT.
## Step 2: Configure the Windows Management Instrumentation firewall exception on target computers
- Ensure that the Windows Management Instrumentation (WMI) firewall exception has been enabled for all target computers. For more information, see [Configure Client Computers](configure-client-computers-vamt.md).
**Note**
To retrieve product license status, VAMT must have administrative permissions on the remote computers and WMI must be available through the Windows Firewall. In addition, for workgroup computers, a registry key must be created to enable remote administrative actions under User Account Control (UAC). For more information, see [Configure Client Computers](configure-client-computers-vamt.md).
## Step 3: Connect to a VAMT database
1. If you are not already connected to a database, the **Database Connection Settings** dialog box appears when you open VAMT. Select the server and database where the keys that must be activated are located.
2. Click **Connect**.
3. If you are already connected to a database, VAMT displays an inventory of the products and product keys in the center pane, and a license overview of the computers in the database. If you need to connect to a different database, click **Successfully connected to Server** to open **the Database Connection Settings** dialog box. For more information about how to create VAMT databases and adding VAMT data, see [Manage VAMT Data](manage-vamt-data.md)
## Step 4: Discover products
1. In the left-side pane, in the **Products** node Products, click the product that you want to activate.
2. To open the **Discover Products** dialog box, click **Discover products** in the **Actions** menu in the right-side pane.
3. In the **Discover Products** dialog box, click **Search for computers in the Active Directory** to display the search options, and then click the search options that you want to use. You can search for computers in an Active Directory domain, by individual computer name or IP address, in a workgroup, or by a general Lightweight Directory Access Protocol (LDAP) query:
- To search for computers in an Active Directory domain, click **Search for computers in the Active Directory**. Then under **Domain Filter Criteria**, in the list of domain names click the name of the domain that you want to search. You can narrow the search further by typing a name in the **Filter by computer name** field to search for specific computers in the domain. This filter supports the asterisk (\*) wildcard. For example, typing "a\*" will display only those computer names that start with the letter "a".
- To search by individual computer name or IP address, click **Manually enter name or IP address**. Then enter the full name or IP address in the **One or more computer names or IP addresses separated by commas** text box. Separate multiple entries with a comma. Note that VAMT supports both IPv4 and IPV6 addressing.
- To search for computers in a workgroup, click **Search for computers in the workgroup**. Then under **Workgroup Filter Criteria**, in the list of workgroup names, click the name of the workgroup that you want to search. You can narrow the search further by typing a name in the **Filter by computer name** field to search for a specific computer in the workgroup. This filter supports the asterisk (\*) wildcard. For example, typing "a\*" will display only computer names that start with the letter "a".
- To search for computers by using a general LDAP query, click **Search with LDAP query** and enter your query in the text box that appears. VAMT will validate the LDAP query syntax, but will otherwise run the query without additional checks.
4. Click **Search**.
When the search is complete, the products that VAMT discovers appear in the product list view in the center pane.
## Step 5: Sort and filter the list of computers
You can sort the list of products so that it is easier to find the computers that require product keys to be activated:
1. On the menu bar at the top of the center pane, click **Group by**, and then click **Product**, **Product Key Type**, or **License Status**.
2. To sort the list further, you can click one of the column headings to sort by that column.
3. You can also use the **Filter** function to narrow your search for computers by clicking **Filter** in the right-side pane to open the **Filter Products** dialog box.
4. In the **Filter Products** dialog box, you can filter the list by computer name, product name, product key type, license status, or by any combination of these options.
- To filter the list by computer name, enter a name in the **Computer Name** box.
- To filter the list by product name, product key type, or license status, click the list you want to use for the filter and select an option. If necessary, click **clear all filters** to create a new filter.
5. Click **Filter**. VAMT displays the filtered list in the product list view in the center pane.
## Step 6: Collect status information from the computers in the list
To collect the status from select computers in the database, you can select computers in the product list view by using one of the following methods:
- To select a block of consecutively listed computers, click the first computer that you want to select, and then click the last computer while pressing the **Shift** key.
- To select computers which are not listed consecutively, hold down the **Ctrl** key and select each computer for which you want to collect the status information.
**To collect status information from the selected computers**
- In the right-side **Actions** pane, click **Update license status** in the **Selected Items** menu and then click a credential option. Choose **Alternate Credentials** only if you are updating products that require administrator credentials that are different from the ones that you used to log on to the computer. Otherwise, click **Current Credentials** and continue to step 2.If you are supplying alternate credentials, in the **Windows Security** dialog box, type the appropriate user name and password and then click **OK**.
- VAMT displays the **Collecting product information** dialog box while it collects the license status of all supported products on the selected computers. When the process is finished, the updated license status of each product will appear in the product list view in the center pane.
**Note**
If a computer has more than one supported product installed, VAMT adds an entry for each product. The entry appears under the appropriate product heading.
## Step 7: Add product keys and determine the remaining activation count
1. Click the **Product Keys** node in the left-side pane, and then click **Add Product Keys** in the right-side pane to open the **Add Product Keys** dialog box.
2. In the **Add Product Key** dialog box, you can select from one of the following methods to add product keys:
- To add product keys manually, click **Enter product key(s) separated by line breaks**, enter one or more product keys, and then click **Add Key(s)**.
- To import a Comma Separated Values File (CSV) that contains a list of product keys, click **Select a product key file to import**, browse to the file location, click **Open** to import the file, and then click **Add Key(s)**.
The keys that you have added appear in the **Product Keys** list view in the center pane.
**Important**
If you are activating many products with a MAK, refresh the activation count of the MAK to ensure that the MAK can support the required number of activations. In the product key list in the center pane, select the MAK and then click **Refresh product key data online** in the right-side pane to contact Microsoft and retrieve the number of remaining activations for the MAK. This step requires Internet access. You can only retrieve the remaining activation count for MAKs.
## Step 8: Install the product keys
1. In the left-side pane, click the product that you want to install keys on to.
2. If necessary, sort and filter the list of products so that it is easier to find the computers that must have a product key installed. See [Step 5: Sort and filter the list of computers](#bkmk-partfive).
3. In the **Products** list view pane, select the individual products which must have keys installed. You can use the **CTRL** key or the **SHIFT** key to select more than one product.
4. Click **Install product key** in the **Selected Items** menu in the right-side pane to display the **Install Product Key** dialog box.
5. The **Select Product Key** dialog box displays the keys that are available to be installed. Under **Recommended MAKs**, VAMT might display one or more recommended MAKs based on the selected products. If you are installing a MAK you can select a recommended product key or any other MAK from the **All Product Keys List**. If you are not installing a MAK, select a product key from the **All Product Keys** list. Use the scroll bar if you want to view the **Description** for each key. When you have selected the product key that you want to install, click **Install Key**. Note that only one key can be installed at a time.
6. VAMT displays the **Installing product key** dialog box while it attempts to install the product key for the selected products. When the process is finished, the status appears in the **Action Status** column of the dialog box. Click **Close** to close the dialog box. You can also click the **Automatically close when done** check box when the dialog box appears.
The same status appears under the **Status of Last Action** column in the product list view in the center pane.
**Note**
Product key installation will fail if VAMT finds mismatched key types or editions. VAMT will display the failure status and will continue the installation for the next product in the list. For more information on choosing the correct product key, see [How to Choose the Right Volume License Key for Windows.](https://go.microsoft.com/fwlink/p/?linkid=238382)
## Step 9: Activate the client products
1. Select the individual products that you want to activate in the list-view pane.
2. On the menu bar, click **Action**, point to **Activate** and point to **Online activate**. You can also right-click the selected computers(s) to display the **Action** menu, point to **Activate** and point to **Online activate**. You can also click **Activate** in the **Selected Items** menu in the right-hand pane to access the **Activate** option.
3. If you are activating product keys using your current credential, click **Current credential** and continue to step 5. If you are activating products that require an administrator credential that is different from the one you are currently using, click the **Alternate credential** option.
4. Enter your alternate user name and password and click **OK**.
5. The **Activate** option contacts the Microsoft product-activation server over the Internet and requests activation for the selected products. VAMT displays the **Activating products** dialog box until the requested actions are completed.
**Note**
Installing a MAK and overwriting the GVLK on client products must be done with care. If the RTM version of Windows Vista has been installed on the computer for more than 30 days, then its initial grace period has expired. As a result, it will enter Reduced Functionality Mode (RFM) if online activation is not completed successfully before the next logon attempt. However, you can use online activation to recover properly configured computers from RFM, as long as the computers are available on the network.
RFM only applies to the RTM version of Windows Vista or the retail editions of Microsoft Office 2010. Windows Vista with SP1 or later, Windows 7, Windows 8, Windows 10, Windows Server 2008, Windows Server 2008 R2, Windows Server 2012, and volume editions of Office 2010 will not enter RFM.
## Related topics
- [VAMT Step-by-Step Scenarios](vamt-step-by-step.md)