---
title: Hello World
ms.reviewer:
description: Use this API to run advanced queries
keywords: apis, supported apis, advanced hunting, query
search.product: eADQiWindows 10XVcnh
ms.prod: w10
ms.mktglfcycl: deploy
ms.sitesec: library
ms.pagetype: security
ms.author: macapara
author: mjcaparas
ms.localizationpriority: medium
manager: dansimp
audience: ITPro
ms.collection: M365-security-compliance
ms.topic: article
---
# Microsoft Defender ATP API - Hello World
**Applies to:** [Microsoft Defender Advanced Threat Protection (Microsoft Defender ATP)](https://go.microsoft.com/fwlink/p/?linkid=2069559)
- Want to experience Microsoft Defender ATP? [Sign up for a free trial.](https://www.microsoft.com/microsoft-365/windows/microsoft-defender-atp?ocid=docs-wdatp-exposedapis-abovefoldlink)
## Get Alerts using a simple PowerShell script
### How long it takes to go through this example?
It only takes 5 minutes done in two steps:
- Application registration
- Use examples: only requires copy/paste of a short PowerShell script
### Do I need a permission to connect?
For the Application registration stage, you must have a **Global administrator** role in your Azure Active Directory (Azure AD) tenant.
### Step 1 - Create an App in Azure Active Directory
1. Log on to [Azure](https://portal.azure.com) with your **Global administrator** user.
2. Navigate to **Azure Active Directory** > **App registrations** > **New registration**.
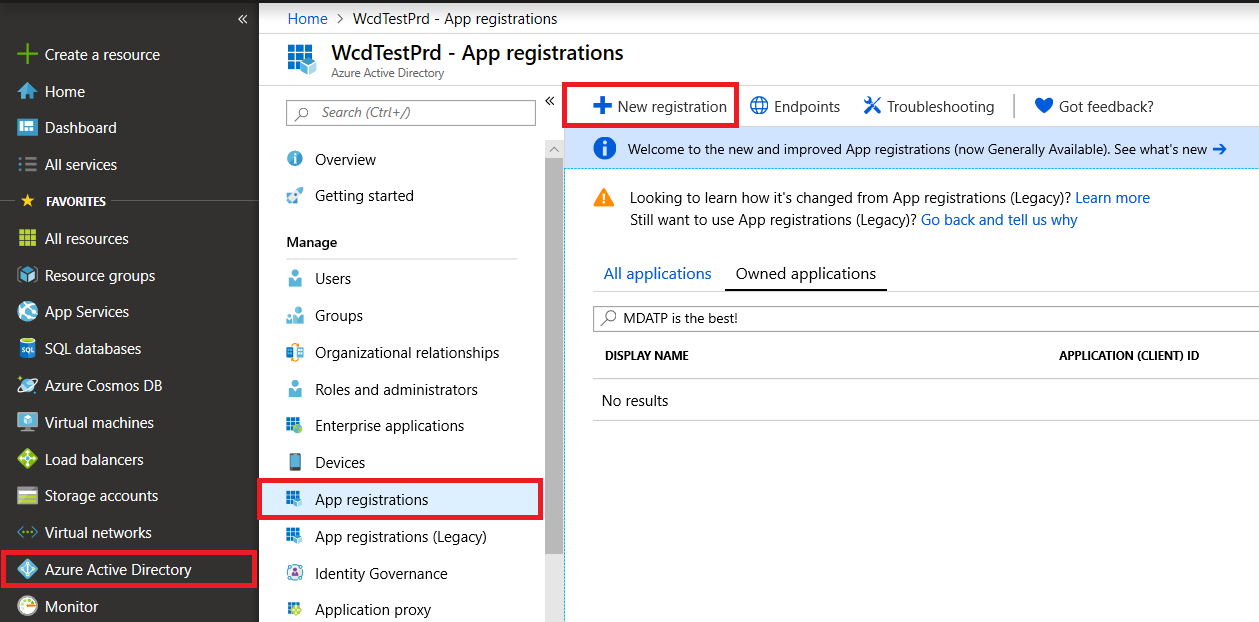
3. In the registration form, choose a name for your application and then click **Register**.
4. Allow your Application to access Microsoft Defender ATP and assign it **'Read all alerts'** permission:
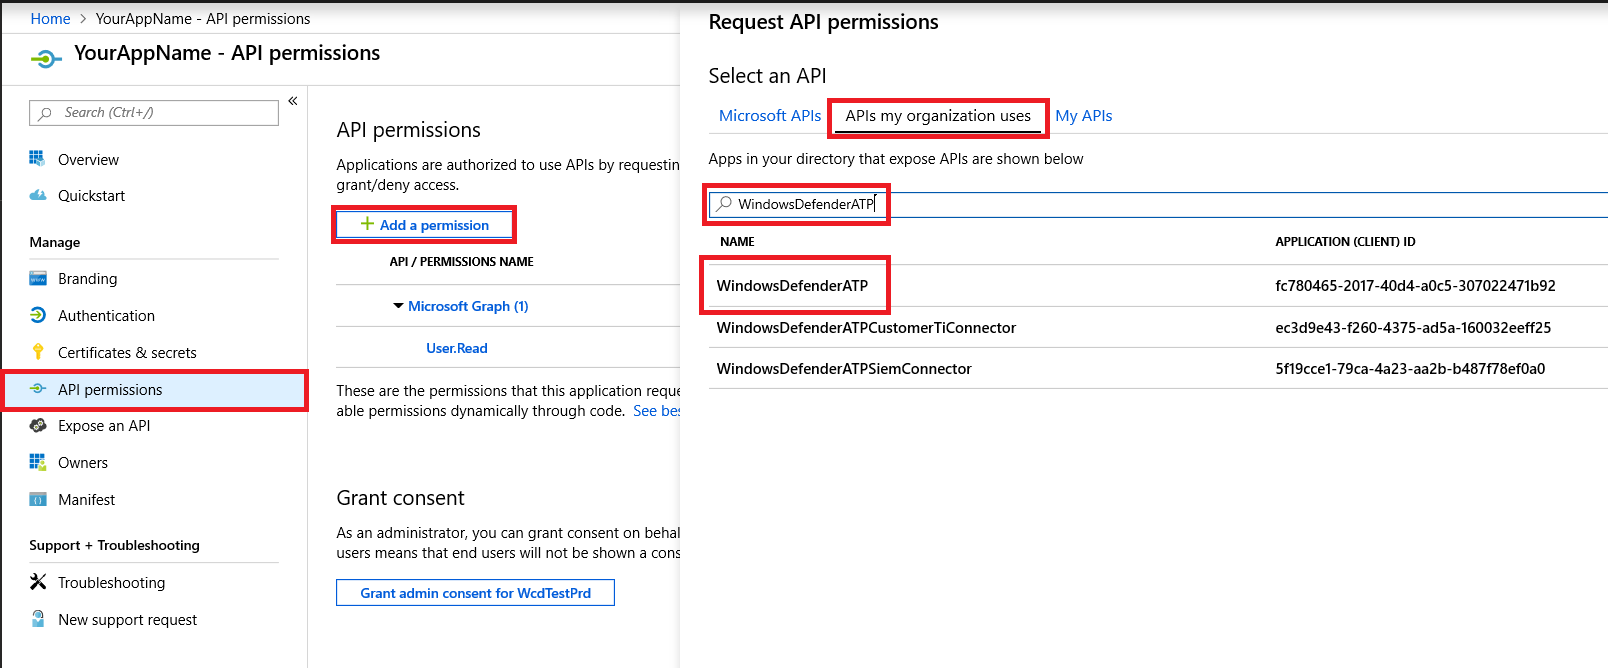
- On your application page, click **API Permissions** > **Add permission** > **APIs my organization uses** > type **WindowsDefenderATP** and click on **WindowsDefenderATP**.
- **Note**: WindowsDefenderATP does not appear in the original list. You need to start writing its name in the text box to see it appear.
- Choose **Application permissions** > **Alert.Read.All** > Click on **Add permissions**
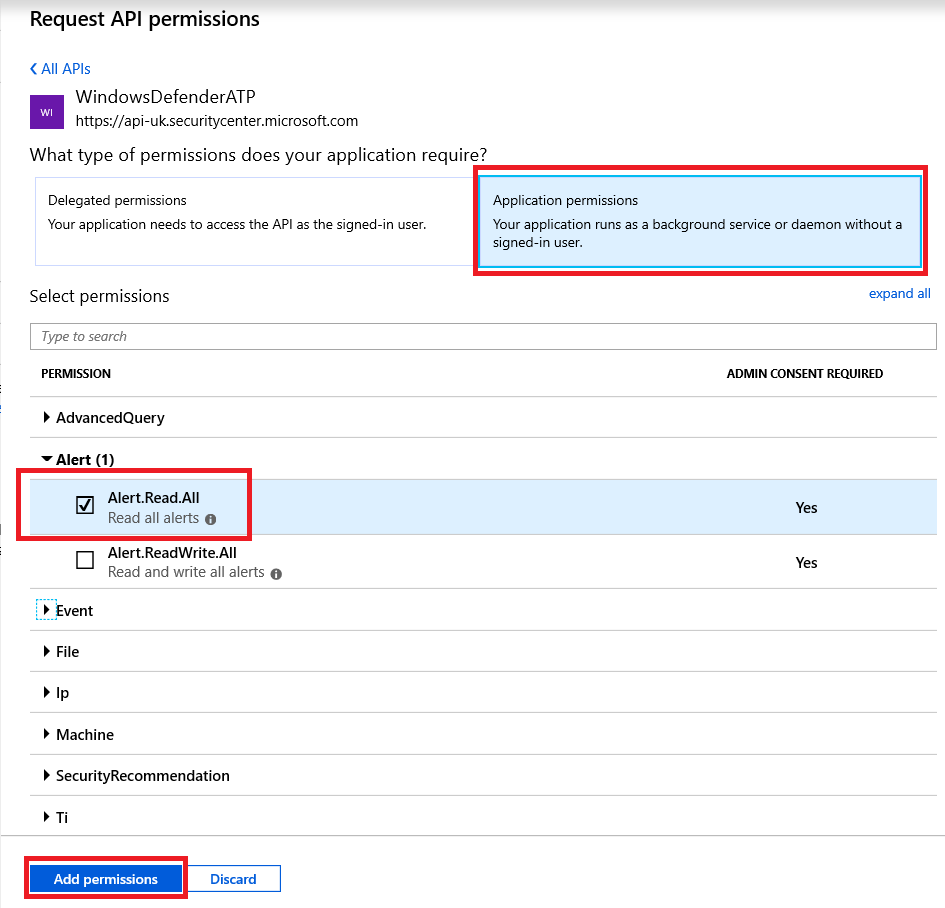
**Important note**: You need to select the relevant permissions. 'Read All Alerts' is only an example!
For instance,
- To [run advanced queries](run-advanced-query-api.md), select 'Run advanced queries' permission
- To [isolate a machine](isolate-machine.md), select 'Isolate machine' permission
- To determine which permission you need, please look at the **Permissions** section in the API you are interested to call.
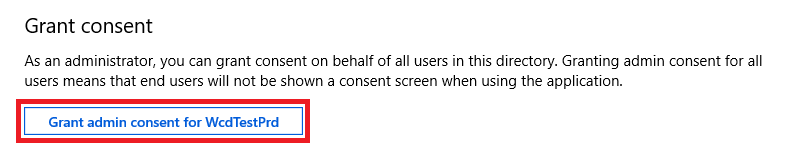
5. Click **Grant consent**
- **Note**: Every time you add permission you must click on **Grant consent** for the new permission to take effect.
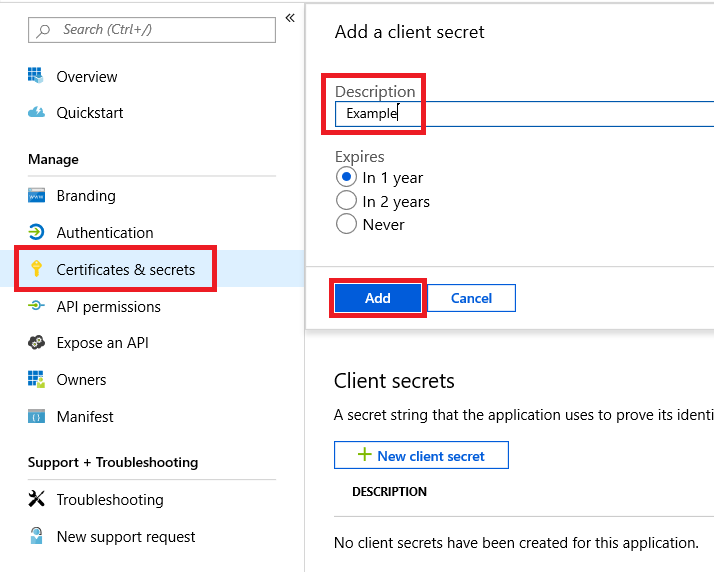
6. Add a secret to the application.
- Click **Certificates & secrets**, add description to the secret and click **Add**.
**Important**: After click Add, **copy the generated secret value**. You won't be able to retrieve after you leave!
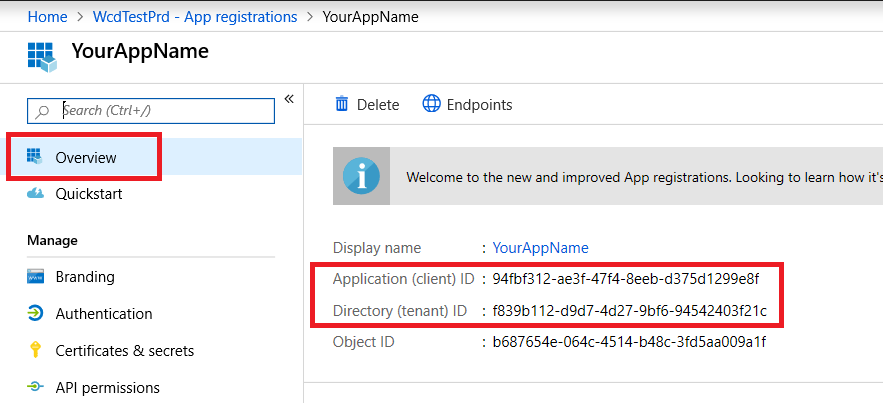
7. Write down your application ID and your tenant ID:
- On your application page, go to **Overview** and copy the following:
Done! You have successfully registered an application!
### Step 2 - Get a token using the App and use this token to access the API.
- Copy the script below to PowerShell ISE or to a text editor, and save it as "**Get-Token.ps1**"
- Running this script will generate a token and will save it in the working folder under the name "**Latest-token.txt**".
```
# That code gets the App Context Token and save it to a file named "Latest-token.txt" under the current directory
# Paste below your Tenant ID, App ID and App Secret (App key).
$tenantId = '' ### Paste your tenant ID here
$appId = '' ### Paste your Application ID here
$appSecret = '' ### Paste your Application secret here
$resourceAppIdUri = 'https://api.securitycenter.windows.com'
$oAuthUri = "https://login.windows.net/$TenantId/oauth2/token"
$authBody = [Ordered] @{
resource = "$resourceAppIdUri"
client_id = "$appId"
client_secret = "$appSecret"
grant_type = 'client_credentials'
}
$authResponse = Invoke-RestMethod -Method Post -Uri $oAuthUri -Body $authBody -ErrorAction Stop
$token = $authResponse.access_token
Out-File -FilePath "./Latest-token.txt" -InputObject $token
return $token
```
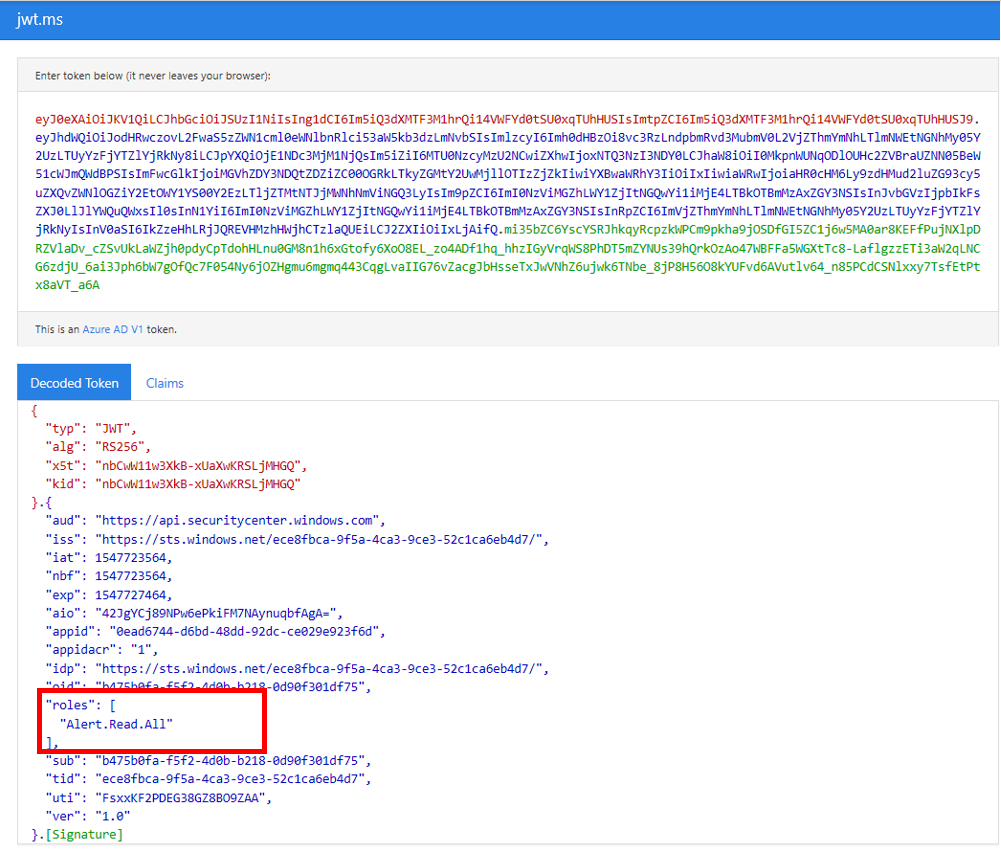
- Sanity Check:
Run the script.
In your browser go to: https://jwt.ms/
Copy the token (the content of the Latest-token.txt file).
Paste in the top box.
Look for the "roles" section. Find the Alert.Read.All role.
### Lets get the Alerts!
- The script below will use **Get-Token.ps1** to access the API and will get the past 48 hours Alerts.
- Save this script in the same folder you saved the previous script **Get-Token.ps1**.
- The script creates two files (json and csv) with the data in the same folder as the scripts.
```
# Returns Alerts created in the past 48 hours.
$token = ./Get-Token.ps1 #run the script Get-Token.ps1 - make sure you are running this script from the same folder of Get-Token.ps1
# Get Alert from the last 48 hours. Make sure you have alerts in that time frame.
$dateTime = (Get-Date).ToUniversalTime().AddHours(-48).ToString("o")
# The URL contains the type of query and the time filter we create above
# Read more about other query options and filters at Https://TBD- add the documentation link
$url = "https://api.securitycenter.windows.com/api/alerts?`$filter=alertCreationTime ge $dateTime"
# Set the WebRequest headers
$headers = @{
'Content-Type' = 'application/json'
Accept = 'application/json'
Authorization = "Bearer $token"
}
# Send the webrequest and get the results.
$response = Invoke-WebRequest -Method Get -Uri $url -Headers $headers -ErrorAction Stop
# Extract the alerts from the results.
$alerts = ($response | ConvertFrom-Json).value | ConvertTo-Json
# Get string with the execution time. We concatenate that string to the output file to avoid overwrite the file
$dateTimeForFileName = Get-Date -Format o | foreach {$_ -replace ":", "."}
# Save the result as json and as csv
$outputJsonPath = "./Latest Alerts $dateTimeForFileName.json"
$outputCsvPath = "./Latest Alerts $dateTimeForFileName.csv"
Out-File -FilePath $outputJsonPath -InputObject $alerts
($alerts | ConvertFrom-Json) | Export-CSV $outputCsvPath -NoTypeInformation
```
You’re all done! You have just successfully:
- Created and registered and application
- Granted permission for that application to read alerts
- Connected the API
- Used a PowerShell script to return alerts created in the past 48 hours
## Related topic
- [Microsoft Defender ATP APIs](exposed-apis-list.md)
- [Access Microsoft Defender ATP with application context](exposed-apis-create-app-webapp.md)
- [Access Microsoft Defender ATP with user context](exposed-apis-create-app-nativeapp.md)