---
title: System Guard Secure Launch and SMM protection (Windows 10)
description: Explains how to configure System Guard Secure Launch and System Management Mode (SMM protection) to improve the startup security of Windows 10 devices.
search.appverid: met150
ms.prod: w10
ms.mktglfcycl: deploy
ms.sitesec: library
ms.pagetype: security
ms.localizationpriority: medium
author: dansimp
ms.date: 03/01/2019
ms.reviewer:
manager: dansimp
ms.author: dansimp
---
# System Guard Secure Launch and SMM protection
This topic explains how to configure [System Guard Secure Launch and System Management Mode (SMM) protection](system-guard-how-hardware-based-root-of-trust-helps-protect-windows.md) to improve the startup security of Windows 10 devices. The information below is presented from a client perspective.
## How to enable System Guard Secure Launch
You can enable System Guard Secure Launch by using any of these options:
- [Mobile Device Management (MDM)](#mobile-device-management)
- [Group Policy](#group-policy)
- [Windows Security Center](#windows-security-center)
- [Registry](#registry)
### Mobile Device Management
System Guard Secure Launch can be configured for Mobile Device Management (MDM) by using DeviceGuard policies in the Policy CSP, specifically [DeviceGuard/ConfigureSystemGuardLaunch](https://docs.microsoft.com/windows/client-management/mdm/policy-csp-deviceguard#deviceguard-configuresystemguardlaunch).
### Group Policy
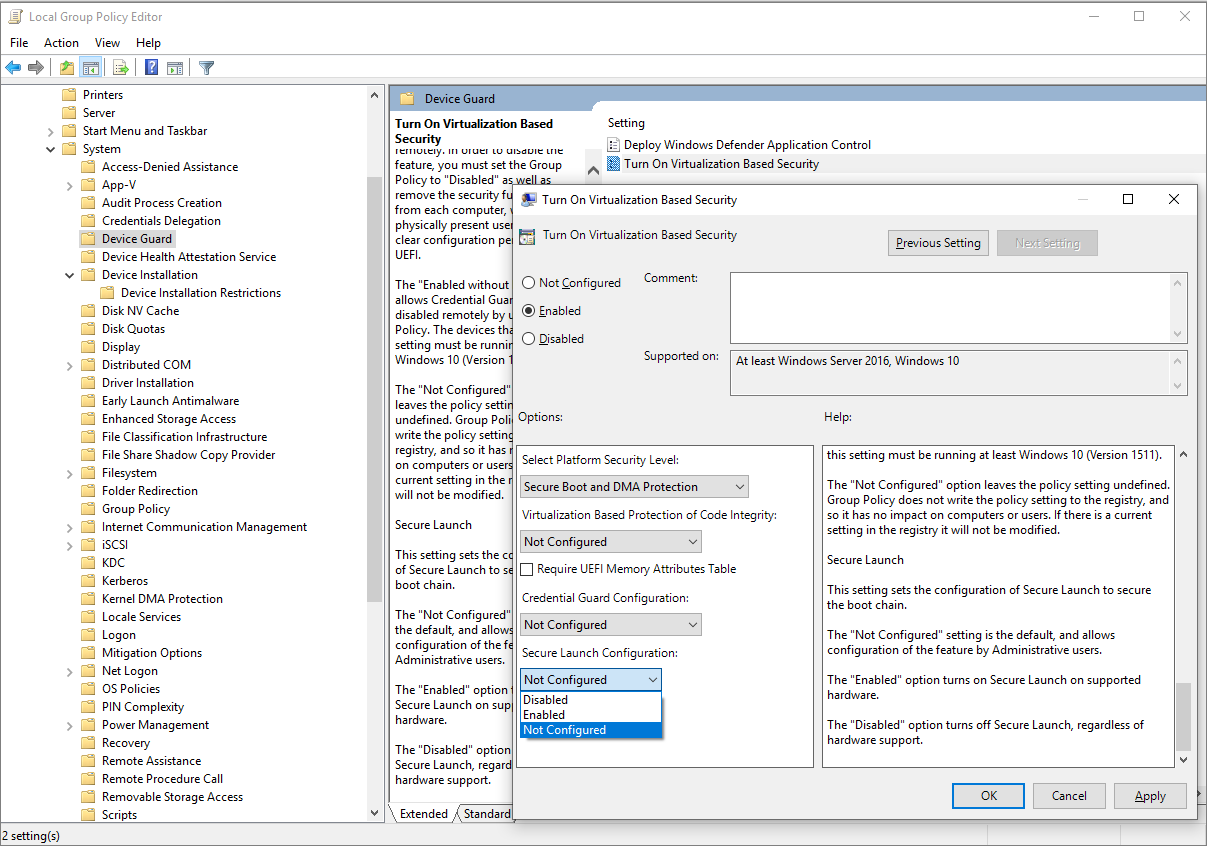
1. Click **Start** > type and then click **Edit group policy**.
2. Click **Computer Configuration** > **Administrative Templates** > **System** > **Device Guard** > **Turn On Virtualization Based Security** > **Secure Launch Configuration**.
### Windows Security Center
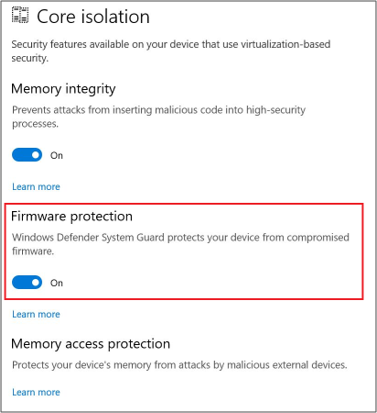
Click **Start** > **Settings** > **Update & Security** > **Windows Security** > **Open Windows Security** > **Device security** > **Core isolation** > **Firmware protection**.
### Registry
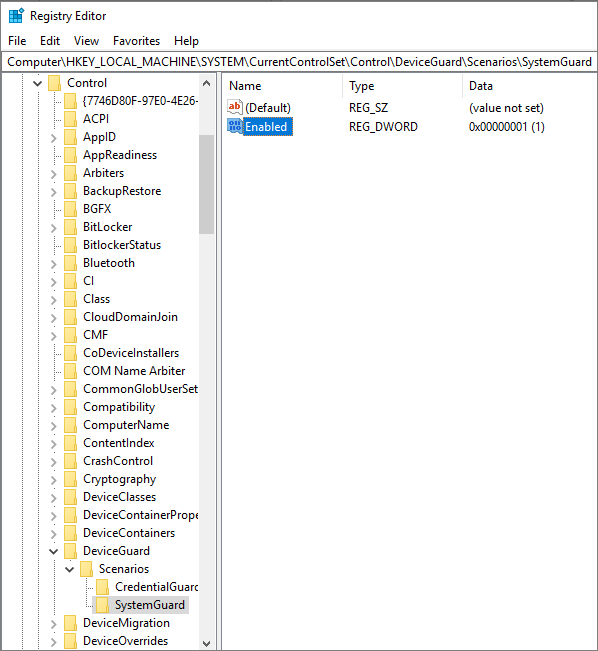
1. Open Registry editor.
2. Click **HKEY_LOCAL_MACHINE** > **SYSTEM** > **CurrentControlSet** > **Control** > **DeviceGuard** > **Scenarios**.
3. Right-click **Scenarios** > **New** > **Key** and name the new key **SystemGuard**.
4. Right-click **SystemGuard** > **New** > **DWORD (32-bit) Value** and name the new DWORD **Enabled**.
5. Double-click **Enabled**, change the value to **1**, and click **OK**.
## How to verify System Guard Secure Launch is configured and running
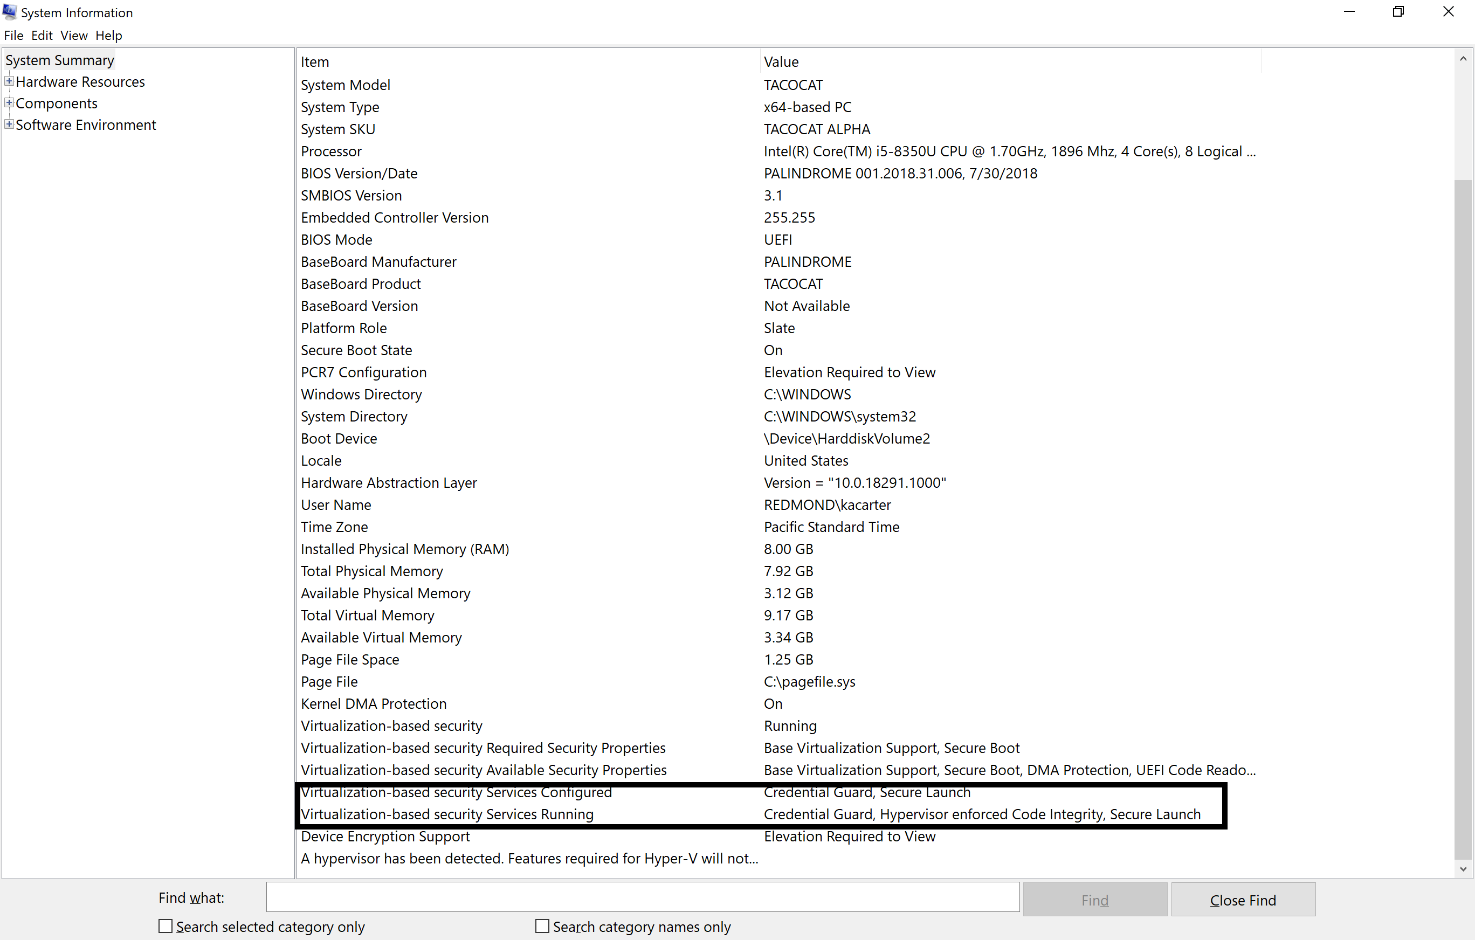
To verify that Secure Launch is running, use System Information (MSInfo32). Click **Start**, search for **System Information**, and look under **Virtualization-based Security Services Running** and **Virtualization-based Security Services Configured**.
>[!NOTE]
>To enable System Guard Secure launch, the platform must meet all the baseline requirements for [Device Guard](https://docs.microsoft.com/windows/security/threat-protection/device-guard/introduction-to-device-guard-virtualization-based-security-and-windows-defender-application-control), [Credential Guard](https://docs.microsoft.com/windows/security/identity-protection/credential-guard/credential-guard-requirements), and [Virtualization Based Security](https://docs.microsoft.com/windows/security/threat-protection/windows-defender-exploit-guard/enable-virtualization-based-protection-of-code-integrity).
## Requirements Met by System Guard Enabled Machines
Any machine with System Guard enabled will automatically meet the following low-level hardware requirements:
|For Intel® vPro™ processors starting with Intel® Coffeelake, Whiskeylake, or later silicon|Description|
|--------|-----------|
|64-bit CPU|A 64-bit computer with minimum 4 cores (logical processors) is required for hypervisor and virtualization-based security (VBS). For more info about Hyper-V, see [Hyper-V on Windows Server 2016](https://docs.microsoft.com/windows-server/virtualization/hyper-v/hyper-v-on-windows-server) or [Introduction to Hyper-V on Windows 10](https://docs.microsoft.com/virtualization/hyper-v-on-windows/about/). For more info about hypervisor, see [Hypervisor Specifications](https://docs.microsoft.com/virtualization/hyper-v-on-windows/reference/tlfs).|
|Trusted Platform Module (TPM) 2.0|Platforms must support a discrete TPM 2.0. Integrated/firmware TPMs are not supported.|
|Windows DMA Protection|Platforms must meet the Windows DMA Protection Specification (all external DMA ports must be off by default until the OS explicitly powers them).|
|SMM communication buffers| All SMM communication buffers must be implemented in EfiRuntimeServicesData ,EfiRuntimeServicesCode , EfiACPIMemoryNVS, or EfiReservedMemoryType memory types. |
|SMM Page Tables| Must NOT contain any mappings to EfiConventionalMemory (e.g. no OS/VMM owned memory).
Must NOT contain any mappings to code sections within EfiRuntimeServicesCode.
Must NOT have execute and write permissions for the same page
Must allow ONLY that TSEG pages can be marked executable and the memory map must report TSEG EfiReservedMemoryType.
BIOS SMI handler must be implemented such that SMM page tables are locked on every SMM entry. |
|Modern/Connected Standby|Platforms must support Modern/Connected Standby.|
|TPM AUX Index|Platform must set up a AUX index with index, attributes, and policy that exactly corresponds to the AUX index specified in the TXT DG with a data size of exactly 104 bytes (for SHA256 AUX data). (NameAlg = SHA256)
Platforms must set up a PS (Platform Supplier) index with: - Exactly the "TXT PS2" style Attributes on creation as follows:
- AuthWrite
- PolicyDelete
- WriteLocked
- WriteDefine
- AuthRead
- WriteDefine
- NoDa
- Written
- PlatformCreate
- A policy of exactly PolicyCommandCode(CC = TPM2_CC_UndefineSpaceSpecial) (SHA256 NameAlg and Policy)
- Size of exactly 70 bytes
- NameAlg = SHA256
- In addition, it must have been initialized and locked (TPMA_NV_WRITTEN = 1, TPMA_NV_WRITELOCKED = 1) at time of OS launch.
PS index data DataRevocationCounters, SINITMinVersion, and PolicyControl must all be 0x00 |
|AUX Policy|The required AUX policy must be as follows: - A = TPM2_PolicyLocality (Locality 3 & Locality 4)
- B = TPM2_PolicyCommandCode (TPM_CC_NV_UndefineSpecial)
- authPolicy = \{A} OR {{A} AND \{B}}
- authPolicy digest = 0xef, 0x9a, 0x26, 0xfc, 0x22, 0xd1, 0xae, 0x8c, 0xec, 0xff, 0x59, 0xe9, 0x48, 0x1a, 0xc1, 0xec, 0x53, 0x3d, 0xbe, 0x22, 0x8b, 0xec, 0x6d, 0x17, 0x93, 0x0f, 0x4c, 0xb2, 0xcc, 0x5b, 0x97, 0x24
|
|TPM NV Index|Platform firmware must set up a TPM NV index for use by the OS with: - Handle: 0x01C101C0
- Attributes:
- TPMA_NV_POLICYWRITE
- TPMA_NV_PPREAD
- TPMA_NV_OWNERREAD
- TPMA_NV_AUTHREAD
- TPMA_NV_POLICYREAD
- TPMA_NV_NO_DA
- TPMA_NV_PLATFORMCREATE
- TPMA_NV_POLICY_DELETE
- A policy of:
- A = TPM2_PolicyAuthorize(MSFT_DRTM_AUTH_BLOB_SigningKey)
- B = TPM2_PolicyCommandCode(TPM_CC_NV_UndefineSpaceSpecial)
- authPolicy = \{A} OR {{A} AND \{B}}
- Digest value of 0xcb, 0x45, 0xc8, 0x1f, 0xf3, 0x4b, 0xcf, 0x0a, 0xfb, 0x9e, 0x1a, 0x80, 0x29, 0xfa, 0x23, 0x1c,0x87, 0x27, 0x30, 0x3c, 0x09, 0x22, 0xdc, 0xce, 0x68, 0x4b, 0xe3, 0xdb, 0x81, 0x7c, 0x20, 0xe1
|
|Platform firmware|Platform firmware must carry all code required to execute an Intel® Trusted Execution Technology secure launch: - Intel® SINIT ACM must be carried in the OEM BIOS
- Platforms must ship with a production ACM signed by the correct production Intel® ACM signer for the platform
|
|Platform firmware update|System firmware is recommended to be updated via UpdateCapsule in Windows Update. |
|For Qualcomm® processors with SD850 or later chipsets|Description|
|--------|-----------|
|Monitor Mode Communication|All Monitor Mode communication buffers must be implemented in either EfiRuntimeServicesData (recommended), data sections of EfiRuntimeServicesCode as described by the Memory Attributes Table, EfiACPIMemoryNVS, or EfiReservedMemoryType memory types|
|Monitor Mode Page Tables|All Monitor Mode page tables must: - NOT contain any mappings to EfiConventionalMemory (e.g. no OS/VMM owned memory)
- They must NOT have execute and write permissions for the same page
- Platforms must only allow Monitor Mode pages marked as executable
- The memory map must report Monitor Mode as EfiReservedMemoryType
- Platforms must provide mechanism to protect the Monitor Mode page tables from modification
|
|Modern/Connected Standby|Platforms must support Modern/Connected Standby.|
|Platform firmware|Platform firmware must carry all code required to perform a launch.|
|Platform firmware update|System firmware is recommended to be updated via UpdateCapsule in Windows Update. |